Changing or disabling the screen timeout on your Android device can significantly improve your experience, whether you want to save battery life or prevent interruptions while using your phone. This guide will walk you through the simple steps to adjust the screen timeout settings, ensuring your device aligns perfectly with your needs. Whether you’re new to Android or just looking to make your device more user-friendly, this tutorial will make the process quick and easy. Let’s get started!

You can adjust your Android screen timeout to as short as 15 seconds or as long as 30 minutes — or even turn it off entirely. However, not all Android devices allow you to keep the screen on indefinitely. If you run into this limitation, you can bypass it using ADB or other advanced device management tools.
How to Change or Disable Screen Timeout on Android
No matter if you’re looking to extend or reduce the screen timeout on your Android device, the steps remain largely the same. The exact process may vary slightly depending on the brand of your device. These instructions are based on a Google Pixel smartphone, with specific variations for Samsung Galaxy devices mentioned where applicable.
Begin by launching the Settings app. Once inside, simply scroll down until you find the Display option.
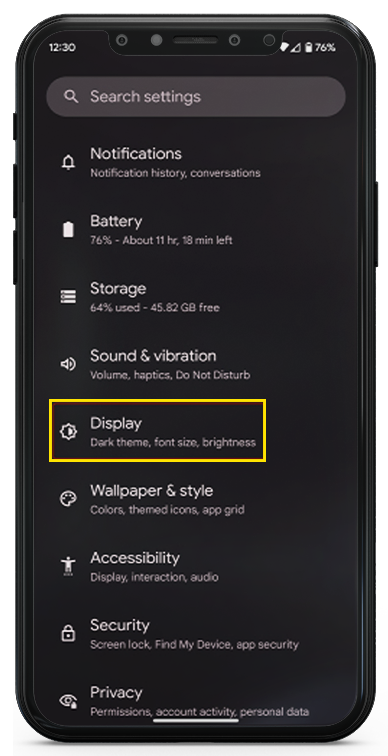
In the Display settings, find the Screen Timeout option. Tap on it and select the duration that works best for you. While the default is set to 30 seconds, you can change it to 15 seconds, one minute, two minutes, five minutes, 10 minutes, or even extend it to 30 minutes.
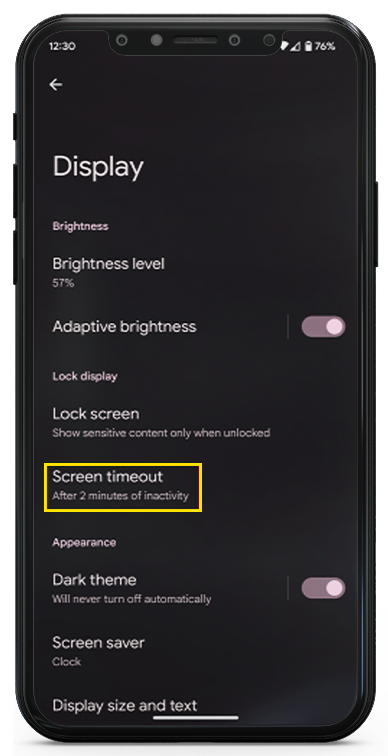

Certain devices offer a “none” option that lets you disable screen timeout entirely, keeping the display on indefinitely. However, if your Android device doesn’t include this feature in the settings app, there isn’t a surefire way to keep the screen on all the time. But you can extend the screen timeout to a point where it’s practically unlimited by using Android’s ADB command line tool, as demonstrated below.
How to adjust screen timeout settings with ADB
If you prefer using the command line to adjust the screen timeout, ADB is a great option. This method is especially useful when managing timeout settings across multiple devices since you can apply the same command to each one. It also allows for more flexibility by letting you set a custom screen timeout duration, even if it’s not available in the Android settings.
Start by connecting your device to the computer with ADB already set up (if you haven’t done that yet, check out our setup guide).
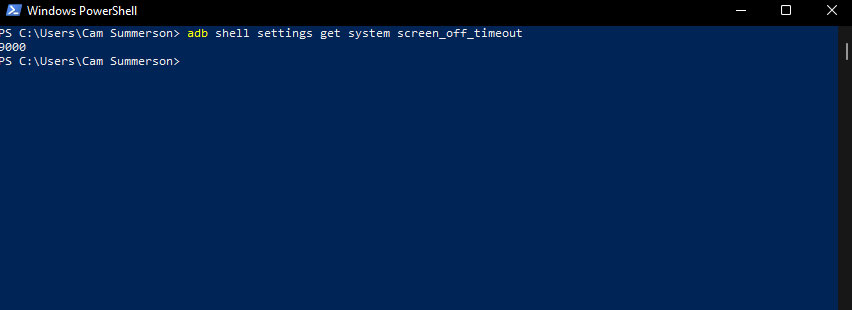
To view the current screen timeout setting on your device, enter this command:
ADB shell settings get system screen_off_timeout.
Here’s how you can adjust the screen timeout setting, measured in milliseconds:
To change the timeout duration, run the following command:
adb shell settings put system screen_off_timeout XXX
Replace XXX with your preferred timeout duration in milliseconds. For instance, if you want the screen to stay on for 12 hours, set it to 43,200,000 milliseconds. For 24 hours, it would be 86,400,000 milliseconds. Keep in mind that the maximum limit is 2,147,483,647 milliseconds, which is about 597 hours.

In Android’s Display Settings menu, you’ll see this option as well. However, if you set a custom screen timeout duration, like 45 or 90 seconds, it may simply display as “Screen Timeout after null of inactivity.”
How to disable screen timeout completely
While many Android devices don’t provide a direct option to disable screen timeout completely through the default Display Settings menu, there is a workaround. By accessing Android’s hidden Developer Options menu, you can adjust the screen timeout settings. However, there’s a catch: for this method to keep your screen on indefinitely, your device needs to be plugged in. If it’s not, the screen will still revert to the standard timeout settings, making this a limited “always-on” solution. Also, enabling developer options can potentially expose your device to security risks.
Here’s how to set your Android screen timeout to never:
- Open the Settings app.
- Scroll down and select About Phone (usually at the bottom of the Settings menu).
- For Galaxy devices, choose Software Information.
- Tap the Build Number seven times.
- You might need to enter your biometric data or passcode. After that, a message will pop up saying, “Congratulations, you are now a developer” (if only becoming a developer was this simple!).
- Return to the main Settings menu, tap on System, and scroll down to find Developer Options.
- For Samsung devices, Developer Options will appear directly in the main Settings menu below About Phone.
- In the Developer Options menu, toggle the Stay Awake feature on.
Now, your screen will remain on as long as your device is plugged in.
Esper simplifies adjusting and disabling screen timeout settings even on thousands of devices
If you’re only adjusting screen timeout settings on a few devices, doing it manually works just fine. But when you need to handle dozens, hundreds, or even thousands of devices, there’s a much simpler solution with Esper’s device management. Our intuitive console and smart grouping system make it just as easy to change the display timeout for a thousand devices as it is for just one. Interested in learning more? Reach out to us, or better yet, sign up today and give us a try no strings attached.
What is screen timeout on Android?
Screen timeout is a feature that automatically turns off your Android device’s display after a period of inactivity to save battery life.
How can I change the screen timeout setting on my Android device?
To change the screen timeout setting, follow these steps:
Open the Settings app.
Tap on Display.
Select Screen timeout (or Sleep).
Choose your preferred timeout duration from the list of options.
Can I disable screen timeout completely?
Yes, on most Android devices, you can disable screen timeout by setting the timeout duration to Never. This option is usually found at the bottom of the screen timeout list. However, not all devices support this option.